Trustee Directories Node
This node, under External Objects in the Workflow Administration Console, lets you view, add, modify, and delete trustee directories that are configured to work with workflows on the Workflow Server. Workflow can interact with any Laserfiche or LDAP trustee directories that appear in this node.
Trustee directories are a collection of users and groups that Workflow can interact with in the following ways:
- Assign Laserfiche repository rights to a user or group. More information.
- Send an e-mail to a user or group. More information.
- Route a Laserfiche entry to a user or group's folder. More information.
- Assign Workflow-specific permissions and access rights to a user or group. More information.
- Find a user or group and retrieve information associated with that user or group. More information.
You can also configure the custom properties for a Laserfiche trustee directory from this node. These custom properties will create tokens.
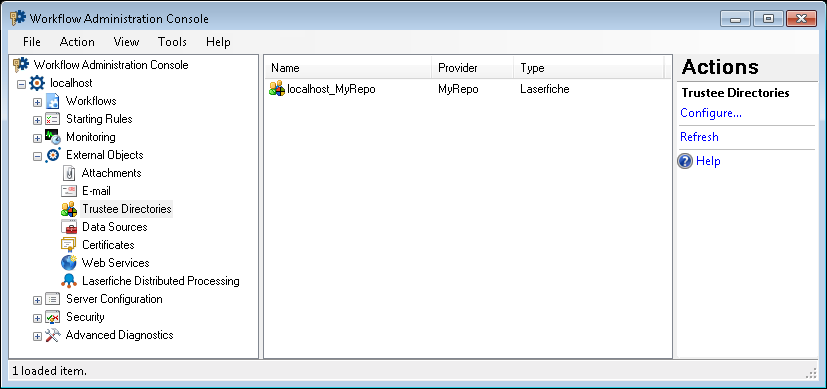
To open this node
- In the Workflow Administration Console's Console Pane, expand the External Objects node.
- Select Trustee Directories. The node will list all the trustee directories on the Workflow Server.
Tip: You can refresh this list to reflect recent changes by clicking the Refresh link below Trustee Directories in the Actions Pane. Alternatively, right-click the Trustee Directories node and select Refresh.
To add or modify a trustee directory
- In the Console Pane, select the Trustee Directories node.
- Click Configure in the Actions Pane, or right-click the node or any trustee directory listed in the center Details Pane and select Configure.
- Select whether you want to Add or Edit an LDAP or Laserfiche trustee directory in the Trustee Directory Manager.
Note: Trustee Directories are automatically added to this node when you configure a monitored repository. Additionally, you can create Trustee Directories in the Configuration Manager.
To delete a trustee directory
- In the center Details Pane, select a trustee directory.
- Click Delete under the directory's name in the Actions Pane, or right-click the trustee directory and select Delete.
Note: You can also delete a trustee directory by clicking Remove in the Trustee Directory Manager.
To add a custom property to a trustee
Note: Custom properties can be accessed as tokens created by the Find User, Find Group, Find Manager, Route Entry to User, and Route Entry to Group activities.
- In the center Details Pane, select a Laserfiche trustee directory.
- Click Configure custom properties under the directory's name in the Actions Pane, or right-click the trustee directory, and select Configure custom properties.
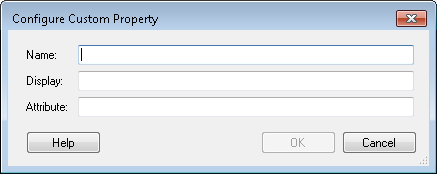
- In the Custom Trustee Directory Properties dialog box, click Add to create a new trustee property.
- Name: In the
 Configure Custom Property dialog box, type a name for your custom property.
 - Display: Type a display name for the property that will appear in the Optional Properties tab of the Trustee Search dialog box.
- Attribute: Type a Laserfiche trustee attribute name for the custom property. When the custom property is given a value in the Trustee Search dialog box, the property's attribute name and value will be listed in the Laserfiche Administration Console under the Attributes tab of a user's properties.
- Click OK.
- Optional: You can modify or remove custom properties from the Custom Trustee Directory Properties dialog box by clicking Edit or Remove.
- After configuring all desired properties, click Close.
Tip: This value can correspond to the LDAP display name of an Active Directory attribute. Workflow can look up the specified attribute value in Active Directory and import the value into Laserfiche as a trustee attribute. For example, specify userPrincipalName in the Name field to look up a user's UPN as specified within Active Directory. See https://msdn.microsoft.com/en-us/library/windows/desktop/ms675090(v=vs.85).aspx for a listing of available Active Directory attributes.
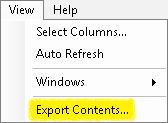
To export the contents of this node in a .csv, .xml, or .txt file
- Select the node in the Console Pane.
- Select View from the main menu.
- Click Export Contents.
- In the Export data dialog box, name the exported file.
- Select CSV File, XML File, or Tab Delimited Text File from the drop-down menu.
- Click Save.